> For the complete documentation index, see [llms.txt](https://udexreal.gitbook.io/udexreal-docs/llms.txt). Markdown versions of documentation pages are available by appending `.md` to page URLs; this page is available as [Markdown](https://udexreal.gitbook.io/udexreal-docs/quick-guide-of-dataglove-and-handdriver2.md).

# Quick Guide of DataGlove and HandDriver2

## 1. Gloves Connection and Hand Movement Demonstration

### 1.1. Open and Connect

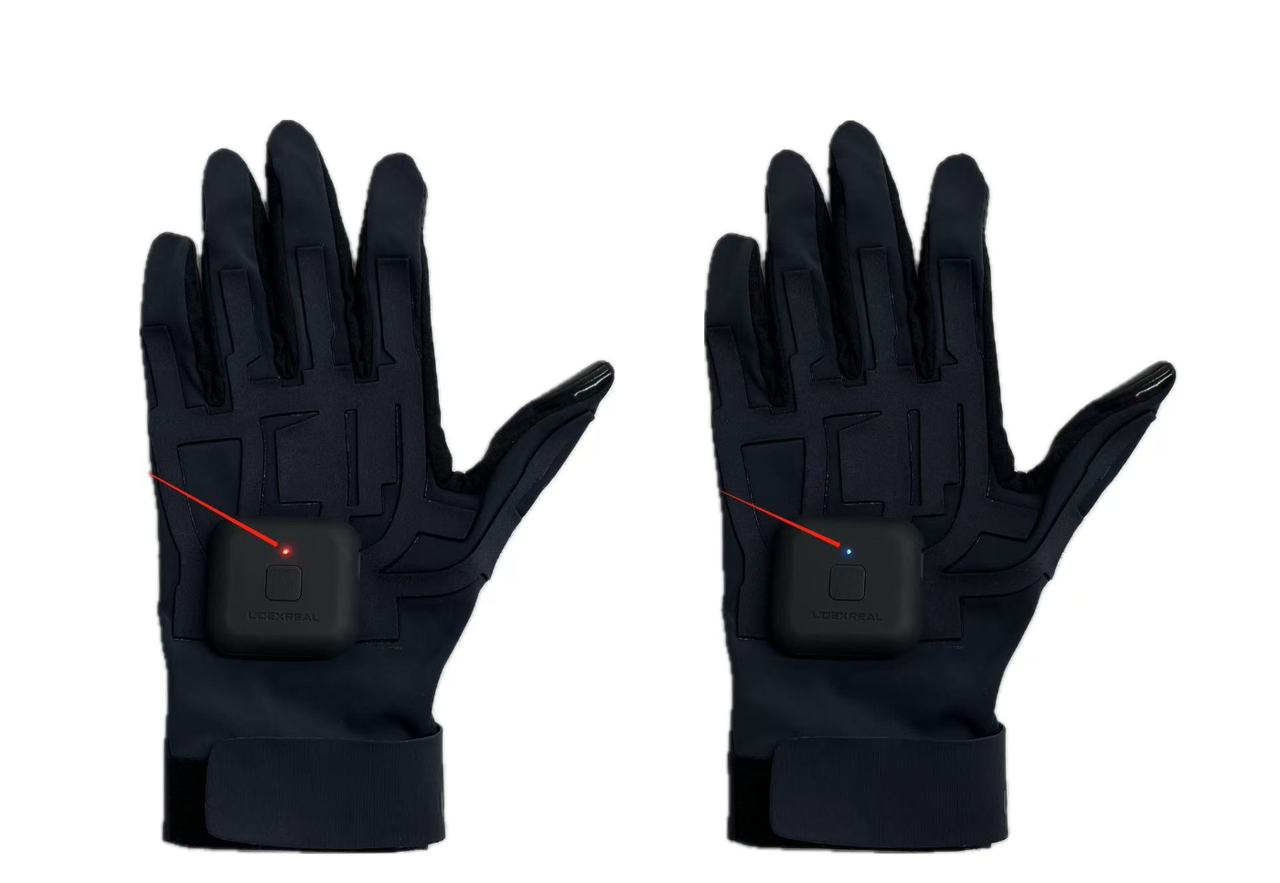
#### 1.1.1. Opening and Connection of Arc-Shaped Data Box Gloves

1. Insert the receiver into the computer, and long press for three seconds to turn on the glove.
2. A red light indicates that the glove is initializing, and a flashing blue light means initialization is complete.

<figure><img src="https://2082502898-files.gitbook.io/~/files/v0/b/gitbook-x-prod.appspot.com/o/spaces%2F8s1Ia6TfFovgyJ5JsDJZ%2Fuploads%2F3z4zEM15PwmGaqlJDJyF%2Fimage.png?alt=media&amp;token=ae5b2ef9-f6e9-4ec1-83fd-af3e875b9ebe" alt="" width="563"><figcaption></figcaption></figure>

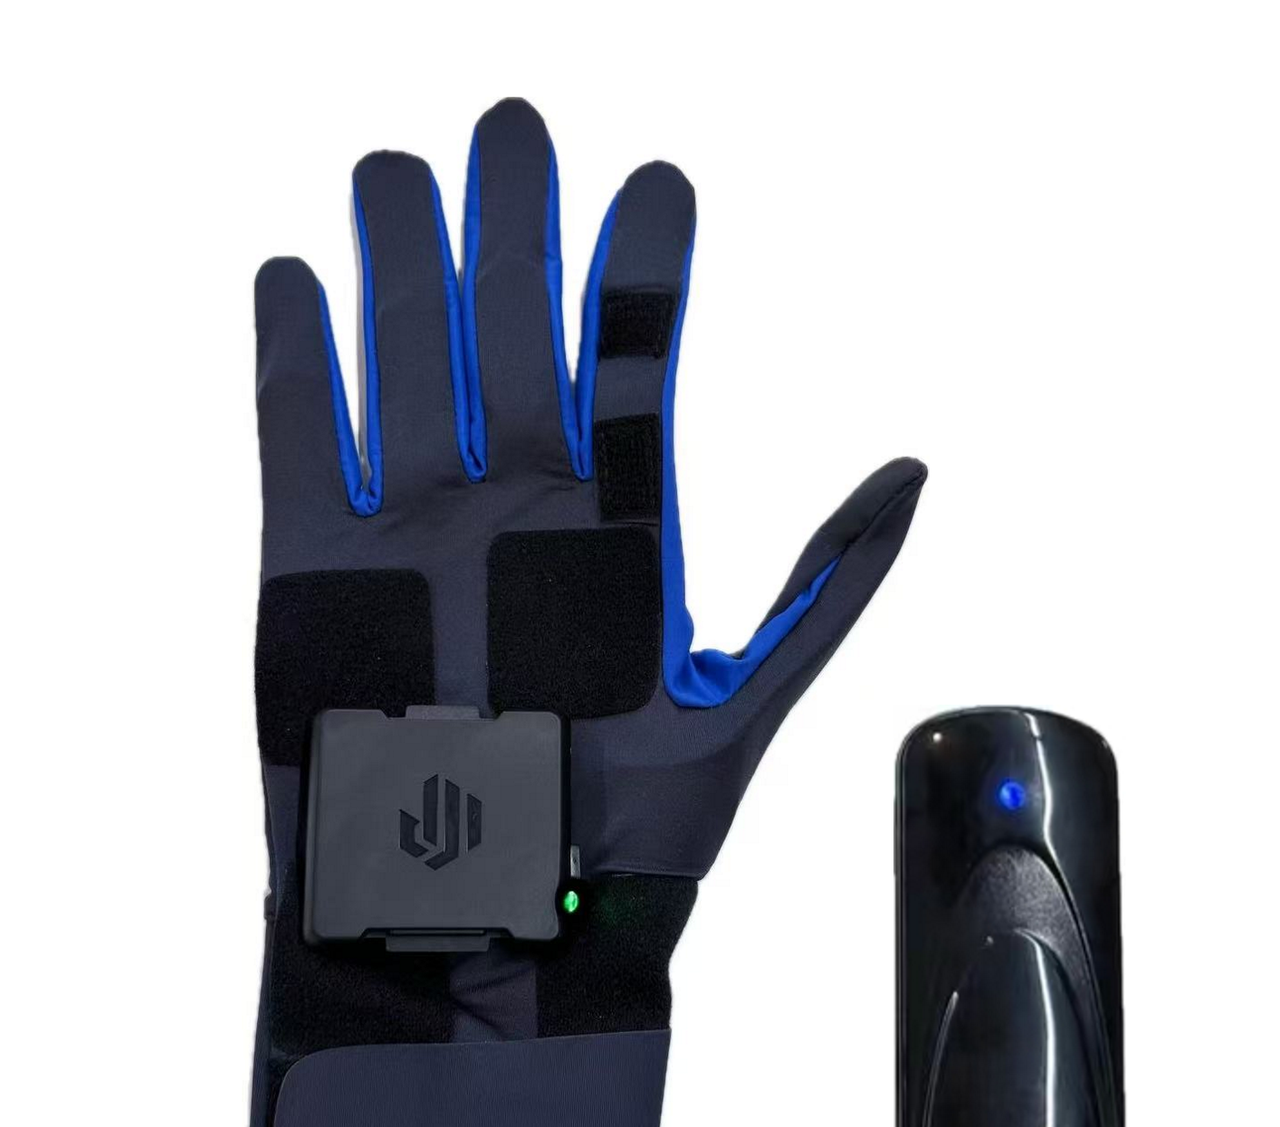
#### 1.1.2. Opening and Connecting of Square Data Box Gloves

1. Insert the receiver, and long press for three seconds to turn on the glove.
2. The blue light of the receiver stays on constantly, and the green light of the glove stays on constantly, indicating that they have been connected to each other.

<figure><img src="https://2082502898-files.gitbook.io/~/files/v0/b/gitbook-x-prod.appspot.com/o/spaces%2F8s1Ia6TfFovgyJ5JsDJZ%2Fuploads%2F65KwCN2lx7Vd7Tm0oMjx%2Fimage.png?alt=media&amp;token=33b5c319-acec-4d20-a3d9-539e9bb5d5a1" alt="" width="375"><figcaption></figcaption></figure>

### 1.2. Hand Movement

#### 1.2.1. Character Settings

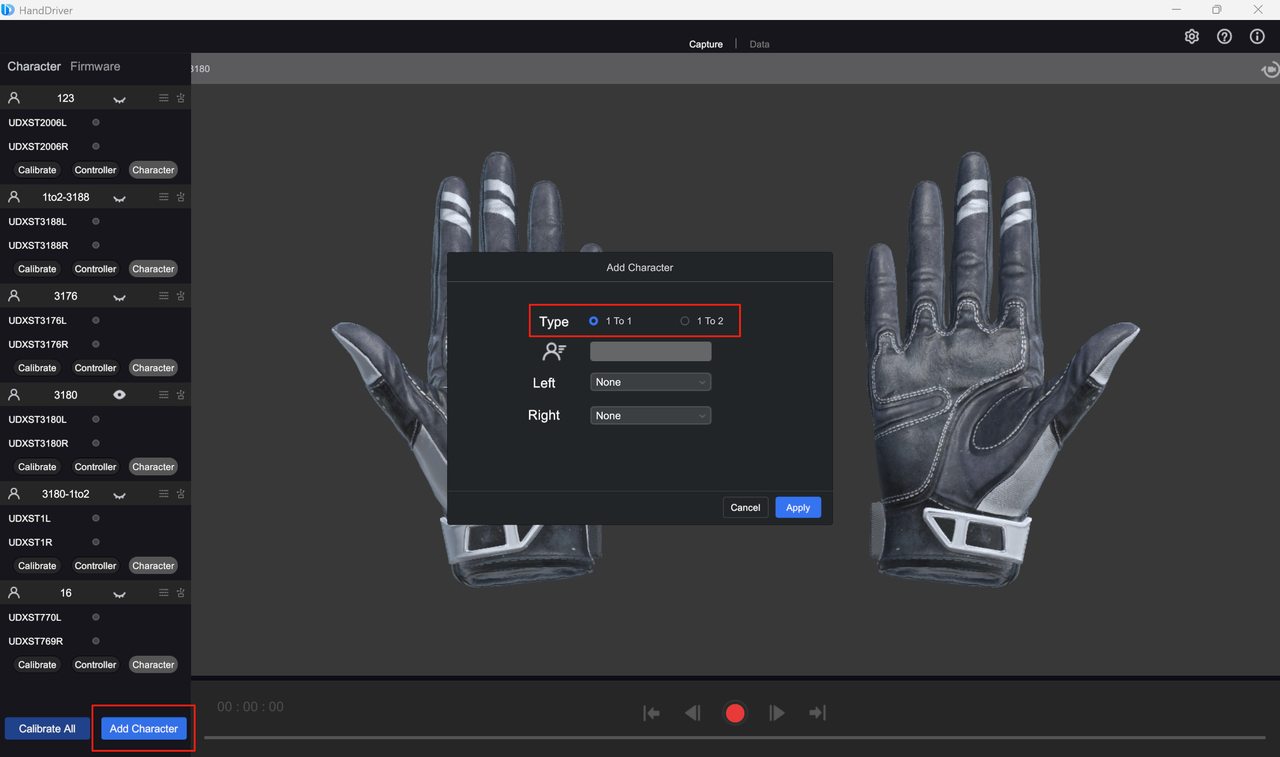
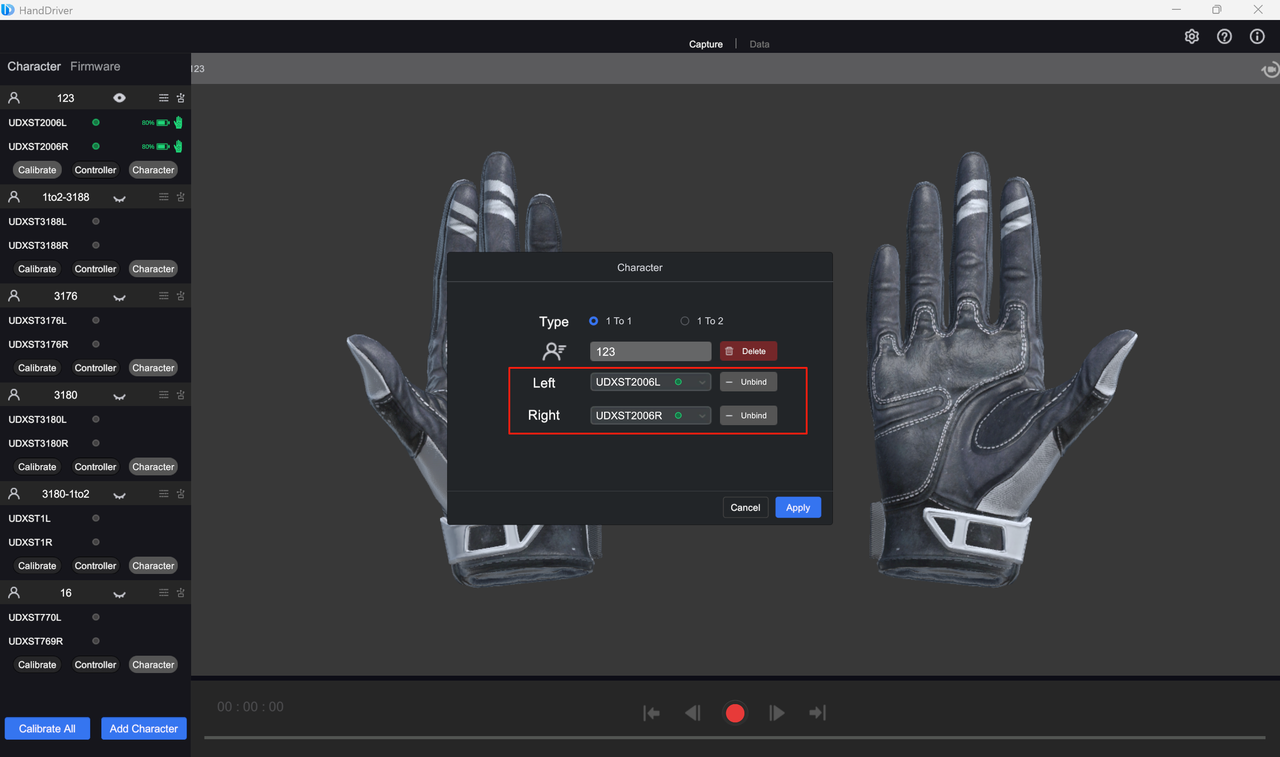
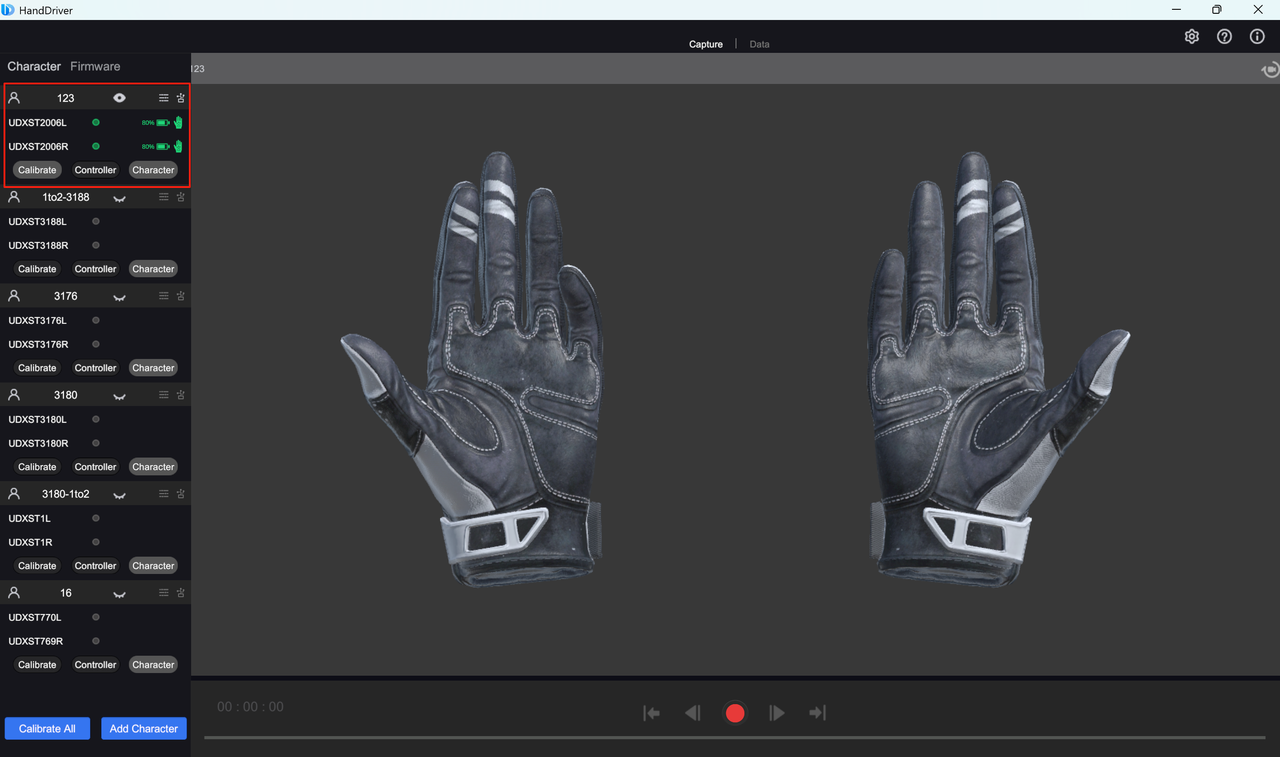
Click "Add Character" in the lower left corner.

1. 1 To 1 Receiver: Select the receiver type, select gloves to complete adding a new character.

<figure><img src="https://2082502898-files.gitbook.io/~/files/v0/b/gitbook-x-prod.appspot.com/o/spaces%2F8s1Ia6TfFovgyJ5JsDJZ%2Fuploads%2FwW4qCHGvkjvonDUfq2Wt%2Fimage.png?alt=media&amp;token=255d6836-1997-479f-a5fa-c3e6aab38eb3" alt=""><figcaption></figcaption></figure>

<figure><img src="https://2082502898-files.gitbook.io/~/files/v0/b/gitbook-x-prod.appspot.com/o/spaces%2F8s1Ia6TfFovgyJ5JsDJZ%2Fuploads%2FFpz2UcPsRxCX74visiQo%2Fimage.png?alt=media&amp;token=47a0cfd7-9cd3-4118-8a8e-7e1df464680c" alt=""><figcaption></figcaption></figure>

<figure><img src="https://2082502898-files.gitbook.io/~/files/v0/b/gitbook-x-prod.appspot.com/o/spaces%2F8s1Ia6TfFovgyJ5JsDJZ%2Fuploads%2FFQiXkFjDpkRtBB9elmnL%2Fimage.png?alt=media&amp;token=3b8bf537-3c5e-4176-9851-1b8f2f7079b7" alt=""><figcaption></figcaption></figure>

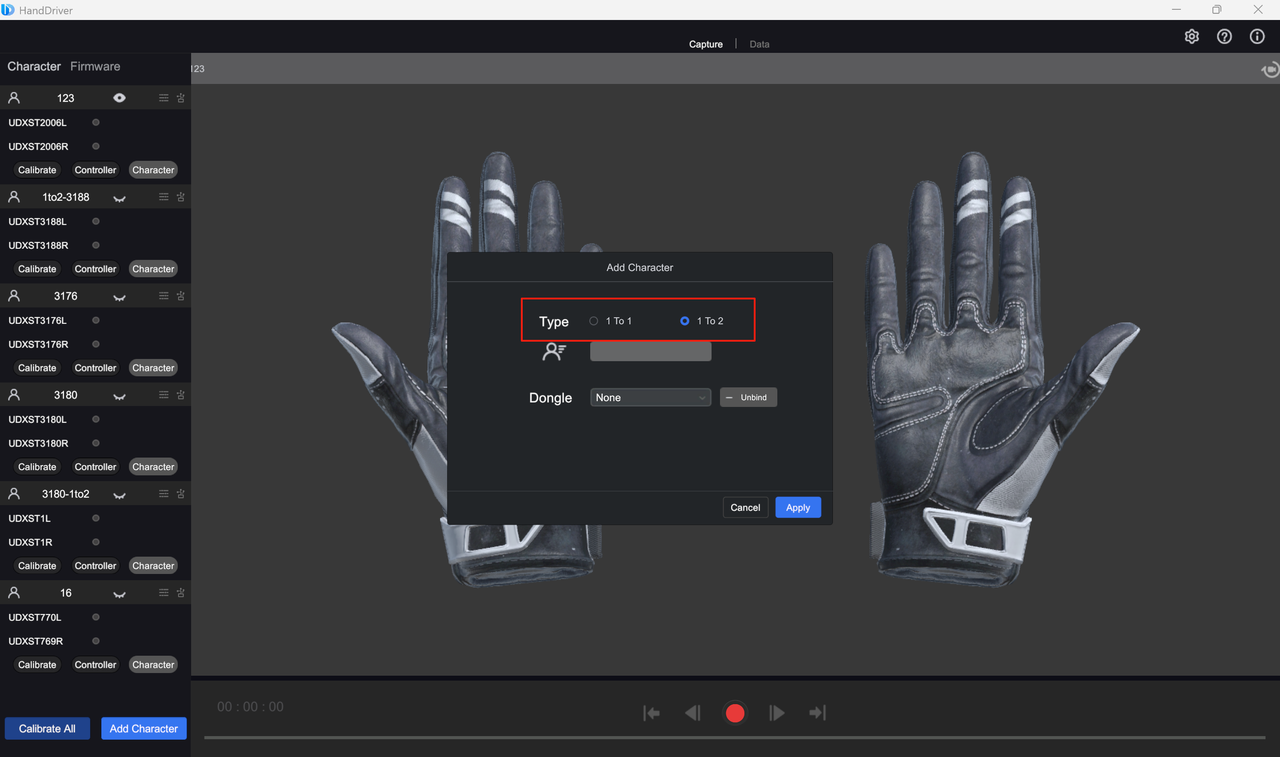
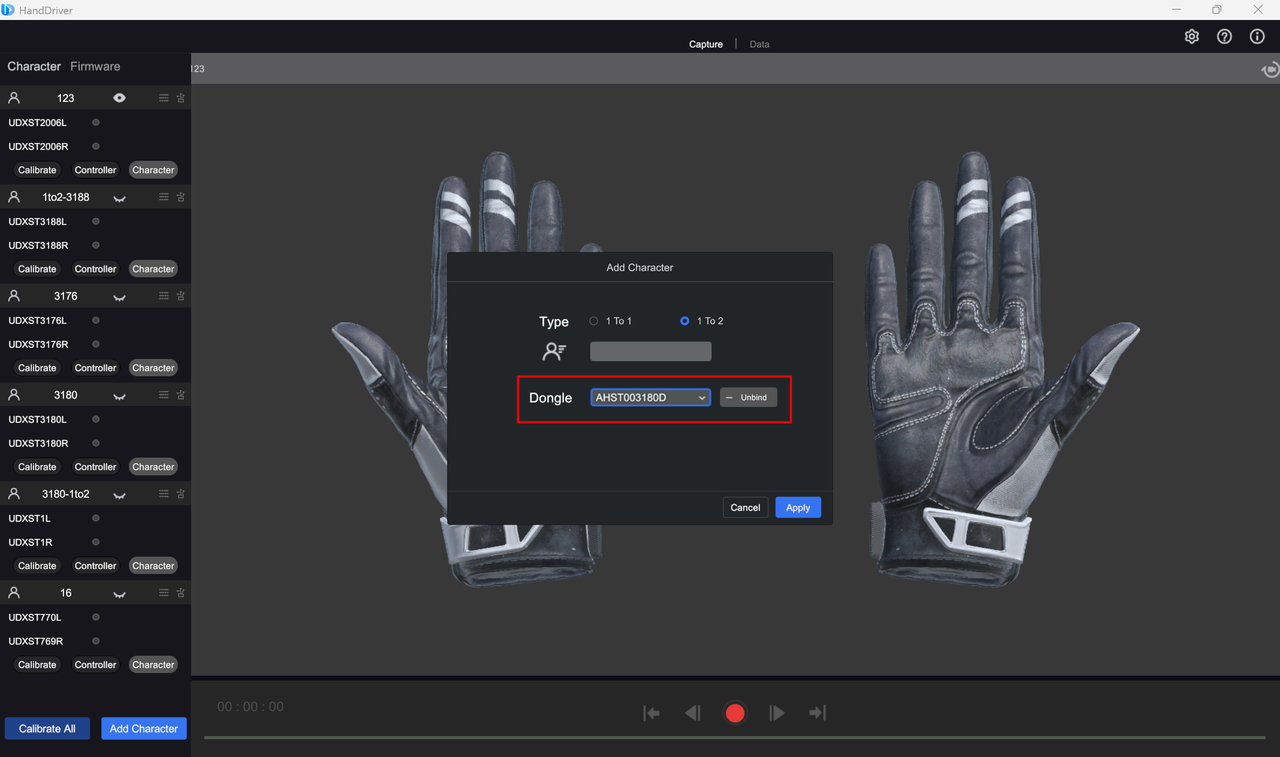
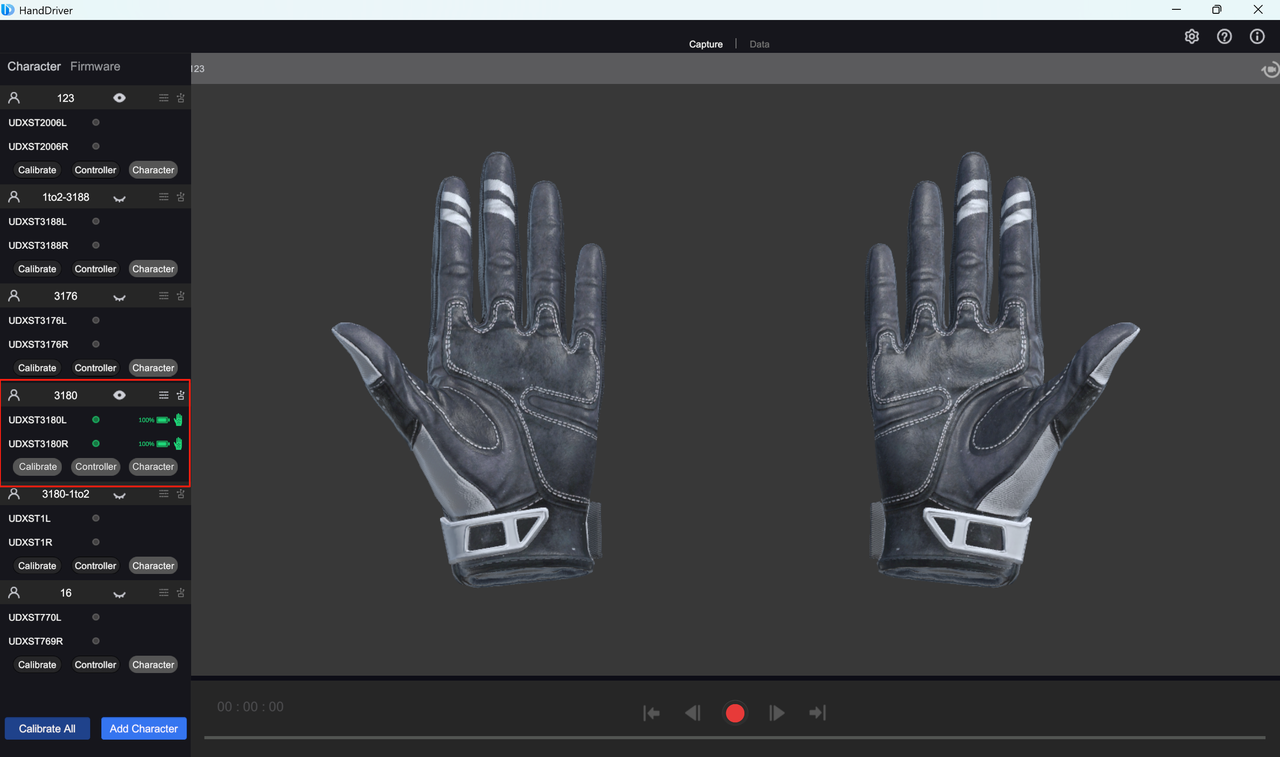
2. 1 To 2 Receiver: Select the receiver type, and complete the addition of a new character after selecting the receiver.

<figure><img src="https://2082502898-files.gitbook.io/~/files/v0/b/gitbook-x-prod.appspot.com/o/spaces%2F8s1Ia6TfFovgyJ5JsDJZ%2Fuploads%2FDupzKjNM5acBpoTLWAOt%2Fimage.png?alt=media&amp;token=c6a363a9-27be-4da0-b80e-f3c487215324" alt=""><figcaption></figcaption></figure>

<figure><img src="https://2082502898-files.gitbook.io/~/files/v0/b/gitbook-x-prod.appspot.com/o/spaces%2F8s1Ia6TfFovgyJ5JsDJZ%2Fuploads%2FtXfJVsy3ILIGwITAdHvC%2Fimage.png?alt=media&amp;token=6f1dc990-c55e-4798-ac47-1f54267c088d" alt=""><figcaption></figcaption></figure>

<figure><img src="https://2082502898-files.gitbook.io/~/files/v0/b/gitbook-x-prod.appspot.com/o/spaces%2F8s1Ia6TfFovgyJ5JsDJZ%2Fuploads%2F4NVovkkIaE9MQBXRV4vd%2Fimage.png?alt=media&amp;token=0a28aff2-7e56-4113-802d-bb741163aaf0" alt=""><figcaption></figcaption></figure>

#### 1.2.2. Motion Calibration

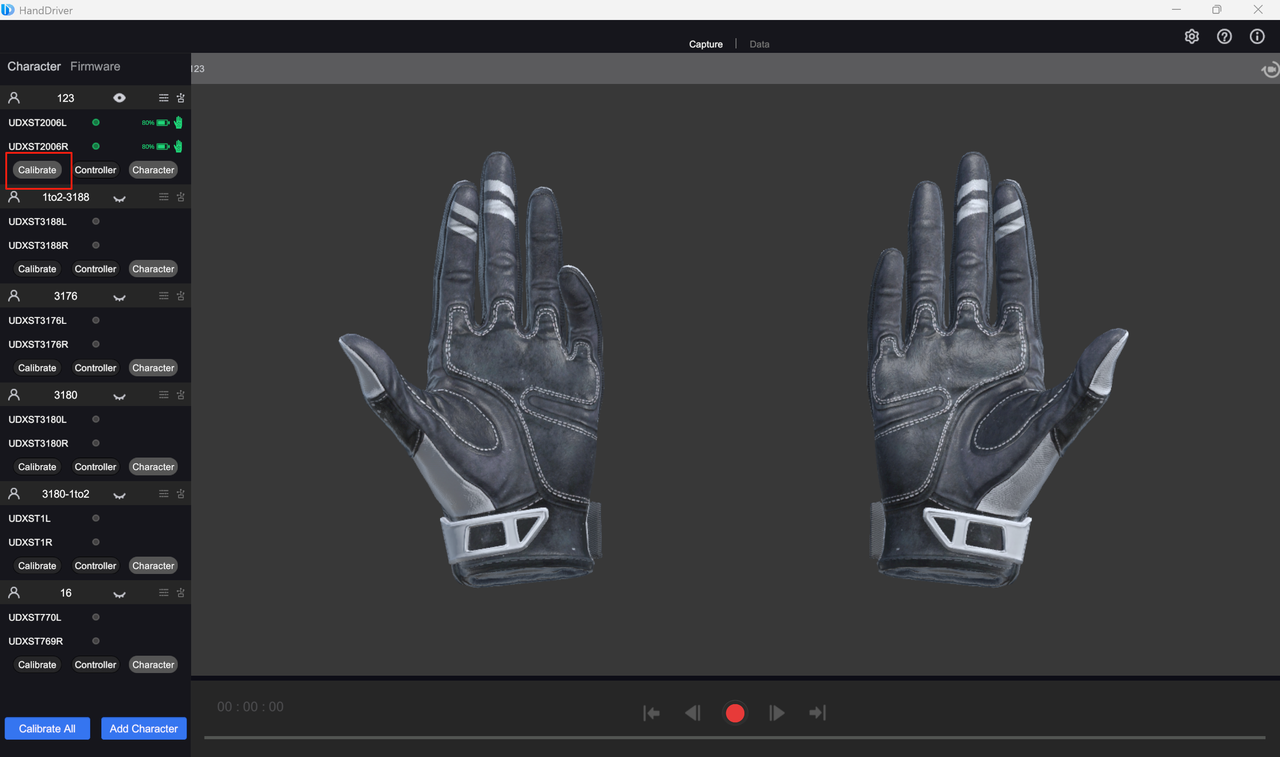
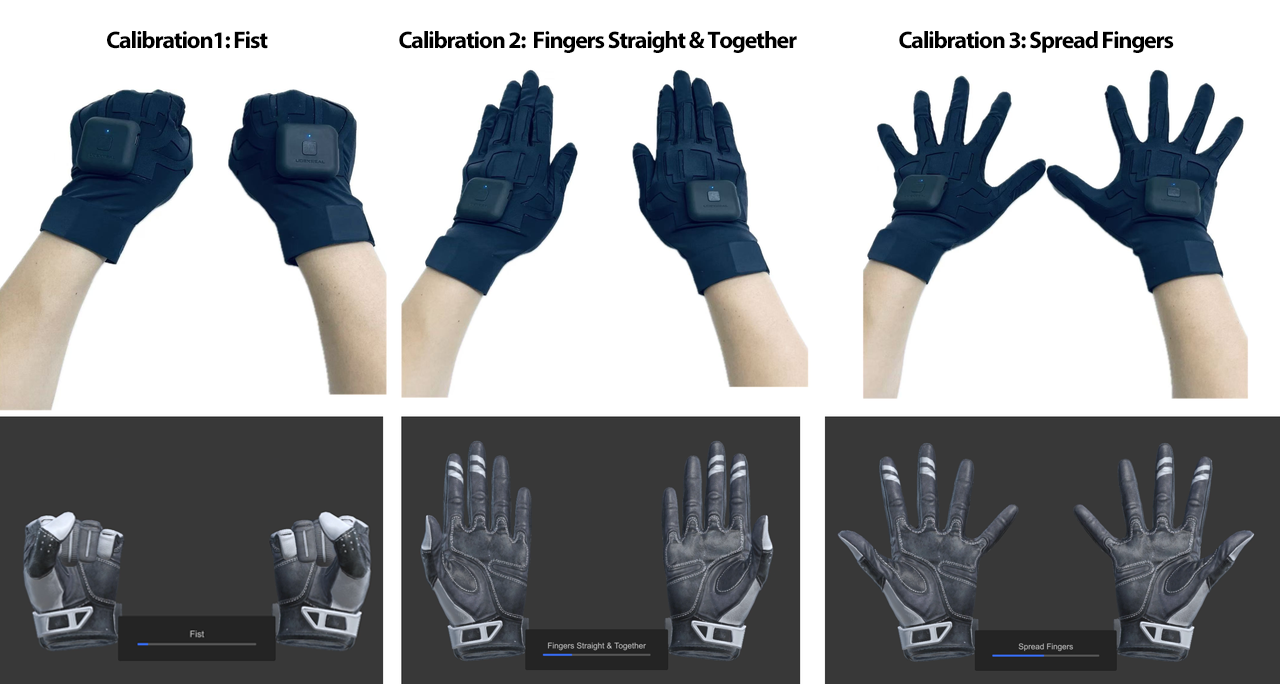
1. Click the "Calibrate" button to complete the three-step "Motion Calibration".

<figure><img src="https://2082502898-files.gitbook.io/~/files/v0/b/gitbook-x-prod.appspot.com/o/spaces%2F8s1Ia6TfFovgyJ5JsDJZ%2Fuploads%2FiN92SLQ7SSg1HSm4GkSF%2Fimage.png?alt=media&amp;token=68b34602-c5e3-41cf-8632-b17b1f9116dc" alt=""><figcaption></figcaption></figure>

* Calibration Motion 1: Make a fist
* Calibration Motion 2: Fingers straight and together
* Calibration Motion 3: Spread the fingers of both hands

<figure><img src="https://2082502898-files.gitbook.io/~/files/v0/b/gitbook-x-prod.appspot.com/o/spaces%2F8s1Ia6TfFovgyJ5JsDJZ%2Fuploads%2Fx848BTGHKzWqQsvohPRO%2Fimage.png?alt=media&amp;token=e1be8e33-89ea-4838-a7a3-0c019e55bb07" alt=""><figcaption></figcaption></figure>

2. After successful calibration, hand motion capture can be performed. Square data box glove users can click "Controller" to calibrate the controller if needed.

## 2. Motion Data Recording

{% hint style="warning" %}
This feature applies to industries such as film/animation and virtual idols, and is not related to the robotics industry. For motion data capture in the robotics industry, please use the relevant data-acquisition products from UDEXREAL Robotics.
{% endhint %}

Hand motion data can be recorded into FBX or BVH format and the corresponding files can be exported.Follow the steps below to record motions in the software:

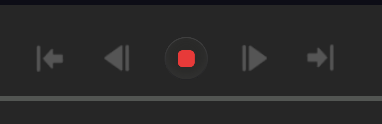
1. Start Recording: Click the recording button directly below the screen to start recording.

<figure><img src="https://2082502898-files.gitbook.io/~/files/v0/b/gitbook-x-prod.appspot.com/o/spaces%2F8s1Ia6TfFovgyJ5JsDJZ%2Fuploads%2FmteDTPCXHm3EFa7WPubC%2Fimage.png?alt=media&amp;token=0bd6c1d5-278b-4f03-8bbb-f8977b1c8bbd" alt="" width="287"><figcaption></figcaption></figure>

2. Recording completed: Click the recording button again to end motion recording.

<figure><img src="https://2082502898-files.gitbook.io/~/files/v0/b/gitbook-x-prod.appspot.com/o/spaces%2F8s1Ia6TfFovgyJ5JsDJZ%2Fuploads%2F1MsPxUA6LjxPxEtvcuYp%2Fimage.png?alt=media&amp;token=1442cb7c-ac99-40c1-b6ec-61aaf678299f" alt="" width="287"><figcaption></figcaption></figure>

3. Export Recording: Click the "Finish" button in the bottom right corner to export the recorded file.

<p align="center"><img src="https://2082502898-files.gitbook.io/~/files/v0/b/gitbook-x-prod.appspot.com/o/spaces%2F8s1Ia6TfFovgyJ5JsDJZ%2Fuploads%2FmGnHVa4XM26Y4Ugiq9br%2Fimage.png?alt=media&amp;token=f7fd7f9f-3062-468f-a737-2d782c7a53cd" alt=""><br></p>

## 3. Motion Data Transmission

Hand movements can be sent to software such as Unity or UE through the data transmission function to drive the movement of digital character models.

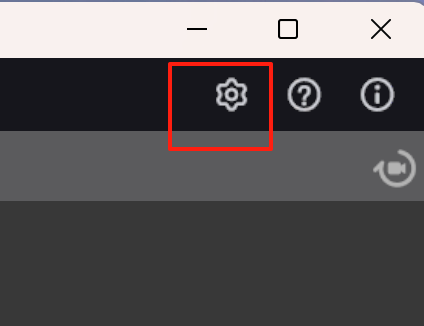
1. Click the settings button in the upper right corner:

<figure><img src="https://2082502898-files.gitbook.io/~/files/v0/b/gitbook-x-prod.appspot.com/o/spaces%2F8s1Ia6TfFovgyJ5JsDJZ%2Fuploads%2FvVDHFrkPSrZwnWM6lVtX%2Fimage.png?alt=media&amp;token=b6005c38-bfe9-4424-a5b9-e329e4b7c5ed" alt="" width="318"><figcaption></figcaption></figure>

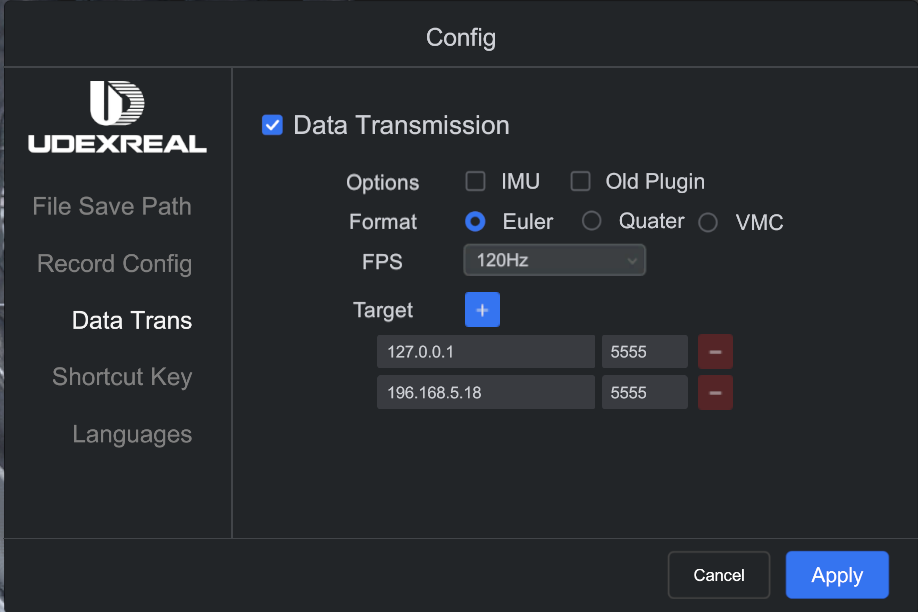
2. Click "Data Trans", check "Data Transmission", then you can set the relevant IP Address and Port Number, with the Port Number defaulting to 5555. After setting, click the "Apply" button to save. If you do not want to save, simply click "Cancel" (by default, do not check IMU and Old Plugins).

<figure><img src="https://2082502898-files.gitbook.io/~/files/v0/b/gitbook-x-prod.appspot.com/o/spaces%2F8s1Ia6TfFovgyJ5JsDJZ%2Fuploads%2FQyYVcW4hHcBWFL35Jxet%2Fimage.png?alt=media&amp;token=db8a82e7-549f-43b5-b212-0a9281078a64" alt="" width="563"><figcaption></figcaption></figure>

3. Once the settings are completed, data can be sent in conjunction with the plugin. For the usage method of the plugin, please refer to the plugin usage instructions section in [UDEXREAL UDCAP DataGlove Product Introduction](/udexreal-docs/udexreal-udcap-dataglove-product-introduction.md).